_画板-1.png)
Tired of staring at plain, boring pavers? Those gaps collect dirt and grow weeds, making your driveway or patio look messy. Adding strips of artificial grass is the perfect, low-maintenance solution.
Yes, you can absolutely put fake grass between pavers. It’s a fantastic design choice that adds a touch of green, improves curb appeal, and is durable enough to handle foot traffic and even vehicles. The process involves preparing the base, cutting the turf, and gluing the edges.

This combination of hardscape and softscape is a popular trend I’ve seen grow over my years in the artificial turf industry. It gives you the best of both worlds: the clean lines of pavers and the lush look of a lawn, without any of the mowing or watering. As an engineer, I appreciate the design. As a supplier, I’ve helped countless customers like you achieve this exact look. Let me walk you through exactly how it’s done, so you can tackle this project with confidence.
How to install artificial grass strips between pavers?
The idea of cutting and fitting turf into narrow gaps can seem tricky. If you get it wrong, the result can look amateurish and won’t last. But don’t worry, I’ll break it down into simple steps.
To successfully install artificial grass strips, you need to prepare a compact base in the gaps, carefully measure and cut your turf to size, and then secure it in place. For areas with traffic, adding sand infill is a crucial final step for durability.
Dive Deeper: The Step-by-Step Installation
From my experience helping customers with projects ranging from small patios to large commercial driveways, success always comes down to proper preparation. Don’t rush these foundational steps.
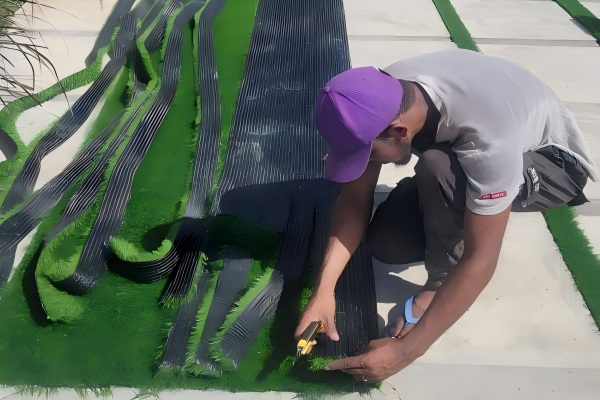
Step 1: Prepare the Base
The longevity of your grass strips depends entirely on what’s underneath them. First, clear out any existing weeds, dirt, or old sand from between the pavers. You need to excavate to a depth of about 2-3 inches. Then, fill a portion of this space with a crushed rock aggregate, often called decomposed granite or crusher fines. Compact it firmly. This creates a stable and permeable foundation1 that allows for excellent drainage, which is crucial to prevent water from pooling. On top of this, add a thin layer of sand to create a smooth surface to lay the grass on.
Step 2: Cut the Artificial Grass
This step requires precision. Measure the width of the gaps in several places, as it might not be perfectly uniform. Always use a sharp utility knife and cut the turf from the back. This allows you to follow the stitching lines for a perfectly straight cut and avoids damaging the grass fibers. Always cut your strips slightly wider than the gap. It’s better to trim a little extra off for a snug fit than to have a gap. Remember to lay all your strips with the grass blades facing the same direction for a consistent look.
Step 3: Add Infill for Durability
Once the turf is laid and fits snugly, you need to brush in a sand infill2. This is a step many people skip, but it’s vital, especially if vehicles will drive over the area. The sand weighs the turf down, protects the backing from UV rays, and helps the grass blades stand up straight, making them more resilient. Use a stiff broom to brush the sand deep into the base of the fibers.
| Tools & Materials Needed | Purpose |
|---|---|
| Shovel / Trowel | Excavating gaps between pavers |
| Crushed Aggregate & Sand | Creating a stable, draining base |
| Plate Compactor (Optional) | To firmly compact the base |
| Measuring Tape & Utility Knife | For precise cutting of the turf |
| Artificial Turf Adhesive | Securing edges to the pavers |
| Silica Sand Infill | For stability, durability, and blade support |
| Stiff Bristle Broom | Brushing in infill and finishing |
How to secure artificial grass edges on concrete?
You’ve perfectly laid your grass strips, but now the edges are lifting. This not only looks bad but can also become a tripping hazard or get caught by tires. I’ll show you how to get a permanent fix.
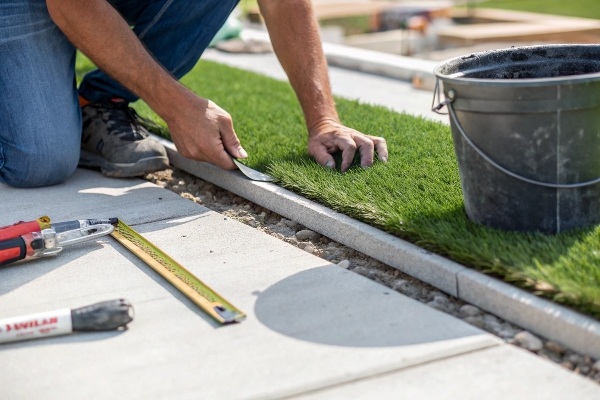
You cannot use nails on concrete pavers. The correct method is to use a high-quality, all-weather artificial turf adhesive3. Apply it to both the paver edge and the turf backing to create a strong, permanent bond that will last for years.
Dive Deeper: The Art of Adhesion
I’ve seen installations fail simply because the wrong glue was used or it was applied incorrectly. The connection point between the turf and the paver is where all the stress occurs, so getting this right is non-negotiable.
Choosing the Right Adhesive
Don’t just grab any construction adhesive from the hardware store. You need a specialized artificial turf glue. These are typically one-part polyurethane adhesives that are moisture-cured. This means they use the ambient moisture in the air to set, creating an incredibly strong and flexible bond. This flexibility is key, as it allows the turf and pavers to expand and contract at different rates with temperature changes without breaking the seal. It must also be rated for outdoor use and be able to withstand rain, heat, and frost.
Proper Application Technique
For a bond that really lasts, follow this method. First, ensure the edges of your pavers are completely clean and dry. Any dust or residue will prevent the glue from sticking properly. Fold back the edge of the artificial grass strip. Apply a generous zigzag bead of the adhesive directly onto the paver. Then, use a small trowel to apply a thin, even layer to the turf backing itself. This dual application is a trick we use to ensure 100% contact. Carefully press the turf strip back into place, ensuring it’s tight against the paver. Finally, place something heavy, like leftover pavers or buckets filled with sand, along the glued edges. Leave them there for at least 24 hours to allow the adhesive to fully cure.
| Securing Method | Best For Concrete/Pavers? | Why? |
|---|---|---|
| Turf Adhesive | Yes, Excellent | Creates a strong, flexible, and permanent bond. |
| Nails / Staples | No, Not Possible | Cannot penetrate concrete and will not hold. |
| Edging Boards | No, Impractical | Not feasible for securing thin strips between pavers. |
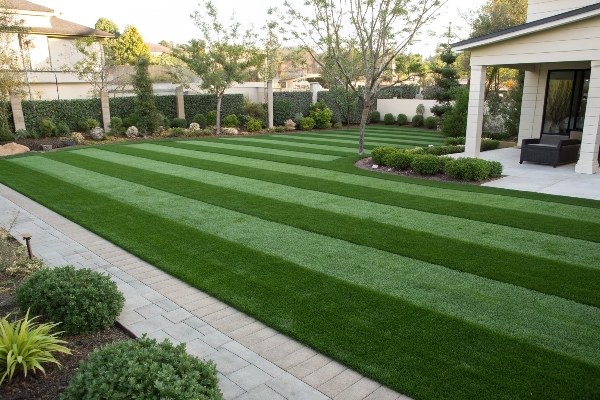
How to put stripes in artificial grass?
You want that professional, manicured look you see on sports fields. But after laying your artificial grass, it just looks like a uniform green carpet. Let me tell you, creating that striped effect4 is easy.
Stripes are just an illusion created by bending the grass fibers in different directions. By brushing alternating sections towards you and away from you with a stiff broom, you create contrasting light and dark stripes.
Dive Deeper: Mastering the Striped Look
When I first started in this industry, I was fascinated by this effect. It seems complex, but it’s pure physics and very simple to achieve. It’s the ultimate finishing touch for any installation.
The "Secret" Behind the Stripes
It all comes down to how light reflects off the individual blades of grass. When I unroll a new roll of turf for a customer, the fibers are often all lying flat in one direction. This can create an initial striped or paneled look when two pieces are laid next to each other in opposite directions. We use a power broom5 to brush the fibers upright, and then we create the final pattern. The rule is simple: when you brush the fibers away from you, you expose more of the side of the blades, which appears as a darker, richer stripe. When you brush the fibers towards you, the tips of the blades reflect more light, appearing as a brighter, lighter stripe.
Step-by-Step Guide to Creating Stripes
After your turf is installed and your infill is spread, you’re ready to create the pattern. It’s like vacuuming a plush carpet.
- Start at one edge of your lawn or driveway.
- Using either an electric power broom or a stiff-bristled push broom, brush a straight line all the way to the other side. Let’s say you brush this first line away from you. This will be your dark stripe.
- Step to the side, and for the next stripe, brush the fibers towards you. This will be your light stripe.
- Continue this alternating pattern—away, towards, away, towards—across the entire surface. The width of your stripes will be determined by the width of your broom. For the most dramatic effect, try to create the pattern so that people will see it from the main viewing angle, such as from the street or the patio.
This simple technique is what separates an average installation from a truly professional-looking one.
Conclusion
Laying artificial grass between pavers is a durable, stylish, and low-maintenance upgrade. By preparing a solid base, securing the edges with proper adhesive, and brushing for a striped finish, you can achieve a stunning result.
-
Find out how to build a foundation that supports drainage and stability for your landscaping projects. ↩
-
Understand the critical role of sand infill in enhancing the durability and appearance of your artificial grass. ↩
-
Explore this link to find top-rated adhesives that ensure a strong, lasting bond for your artificial grass. ↩
-
Learn expert techniques for creating a stunning striped effect on your artificial grass for a professional finish. ↩
-
Discover how a power broom can simplify the process of maintaining your artificial grass and achieving the perfect look. ↩
_画板-1.png)