_画板-1.png)
Your beautiful new artificial lawn is almost ready, but visible seams can ruin the entire look. Let me show you the professional methods for a perfect, seamless finish every time.
To properly join artificial turf, you must use a combination of specialized seam tape and a strong, purpose-made adhesive. This creates a durable bond that holds the two pieces together securely, making the seam strong and invisible. Nails are then used to secure the perimeter of the entire installation.
Getting the joining process right is the difference between an amateur job and a professional installation. A well-made seam is what gives your artificial grass that flawless, natural look of a continuous lawn. It’s not just about looks; a poor seam can be a safety hazard and will fail much sooner, costing you more in the long run. But don’t worry, I have done this hundreds of times, and I am here to guide you. Let’s break down the exact steps and tools you need to get a result you can be proud of.
How do you join two pieces of artificial turf?
You have two rolls of turf, but lining them up perfectly seems impossible. A crooked seam draws the eye and screams "fake grass," ruining your hard work and investment.
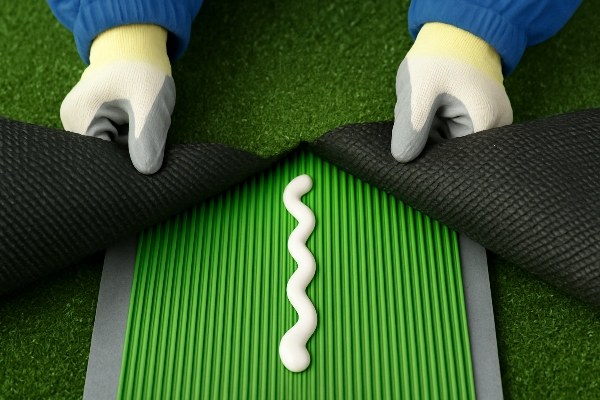
First, lay the turf pieces side-by-side with a tiny gap. Fold back the edges and place seam tape underneath, shiny-side down. Apply turf adhesive in a zig-zag pattern on the tape, then carefully press the turf edges back down for a strong, invisible bond.
Joining turf is a skill, but it’s one you can master by following the right steps. The details are what matter here. In my years as an engineer, I’ve seen many projects fail due to simple mistakes at this stage. Here’s how the professionals do it.
Step 1: Preparation is Key
Before you cut or glue anything, roll out your turf pieces and let them relax under the sun for an hour or two. This helps remove any creases from being rolled up. Most importantly, make sure the direction of the grass blades, or the "pile direction1," is the same on both pieces. If they face opposite ways, the color and texture will look completely different, and no amount of skill can hide that.
Step 2: Trimming for a Perfect Match
Never try to join the factory edges of the turf rolls. They are always uneven. Lay the two pieces side by side with a very small gap. Fold back the edge of each piece and use a sharp utility knife to trim off the outer 2-3 stitch rows. This creates a clean, straight edge. When you bring them together, the seam should be almost invisible.
Step 3: Applying Seam Tape and Glue
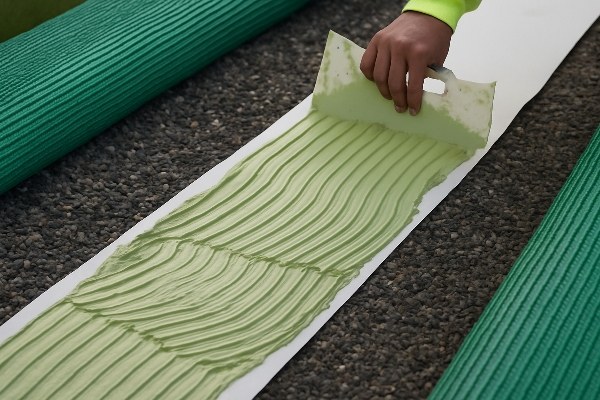
Center your seam tape under the join, making sure the shiny side is facing down. Fold back the turf edges again. Apply a quality turf adhesive onto the dull, fabric side of the tape in a generous "S" or zig-zag pattern. Use a trowel to spread it to a consistent thickness of about 2-3 mm. Carefully press one side of the turf down, then the other, making sure no grass fibers get stuck in the glue.
Do you need seam tape for turf?
You see glue and seam tape as extra costs, and you wonder if you can just skip the tape. But this shortcut will lead to weak joints and failed seams.
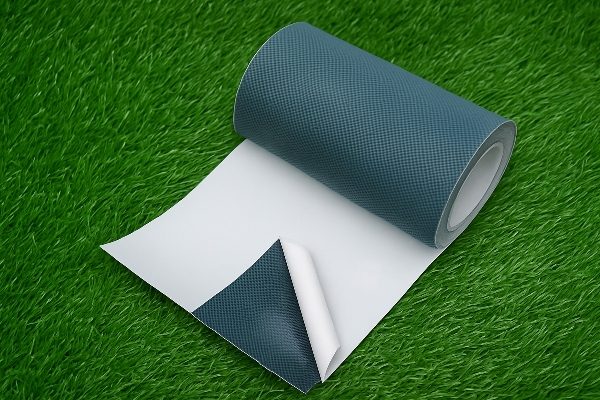
Yes, you absolutely need seam tape. It acts as the crucial bridge holding the two turf pieces together. The glue bonds the turf backing to the tape, not the ground, creating a strong, flexible seam that withstands weather changes and foot traffic. It’s a non-negotiable step.
I’ve had customers ask me this before, hoping to save a little money. My answer is always the same: skipping the seam tape is one of the most expensive mistakes you can make. The cost of the tape is tiny compared to the cost of re-doing a failed seam a year later. The tape serves a specific mechanical purpose that glue alone cannot replicate.
Why is Seam Tape Essential?
Seam tape is a strip of non-woven fabric with a waterproof backing. It’s designed specifically to work with turf adhesive. When you spread glue on it, the glue bonds with the fabric, which in turn holds the backing of both turf pieces. This creates a single, unified piece of turf that is strong yet flexible enough to handle ground movement and temperature changes2. Trying to glue turf directly to the sub-base will create a brittle, rigid line that will crack and separate.
Comparing Methods: With vs. Without Tape
To understand its importance, look at the difference it makes. A proper seam is the backbone of a good installation.
| Feature | With Seam Tape | Without Seam Tape |
|---|---|---|
| Seam Strength | Very Strong & Flexible | Weak & Brittle |
| Durability | Long-lasting for years | Fails within a season |
| Installation | Clean, professional finish | Messy, risk of glue on fibers |
| Movement Tolerance | Accommodates expansion/contraction | Cracks and separates easily |
There are self-adhesive tapes available, but for the best and most permanent results, especially in high-traffic areas or climates with temperature swings, I always recommend using a separate, high-quality turf adhesive with standard seam tape.
Are staples or nails better for artificial turf?
You need to secure the turf edges, and staples and nails are the common choices. But using the wrong fastener can cause ugly dimples, rust stains, or lifting edges.
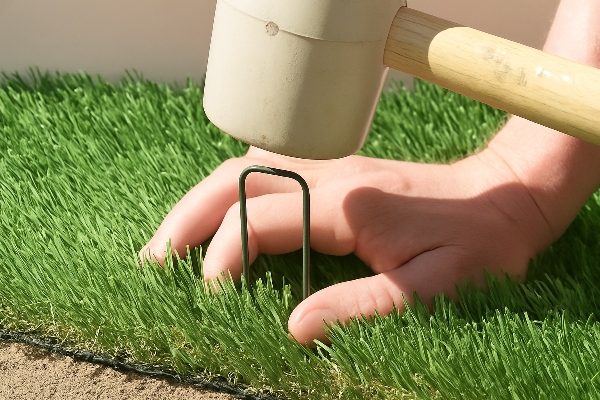
Galvanized nails, typically 5 to 6 inches long, are far better than staples for securing artificial turf. They provide superior holding power, resist rust, and are less likely to create visible indentations on the surface when installed correctly. Staples are often too weak and can rust.
While seams are joined with glue, the perimeter of your entire turf area must be fastened to the sub-base. This prevents the edges from lifting up and keeps the whole installation secure. For years, I saw installers use generic staples from a hardware store, and then I saw the problems that followed. Based on my experience, there is a clear winner for this job.
The Problem with Staples
The main issue with staples is their lack of holding power. They are shorter and thinner than a good nail. Over time, as the ground settles and temperatures change, staples can work their way loose. Worse, unless they are high-quality galvanized steel, they will rust. This rust can bleed onto your turf and sub-base, leaving ugly brown stains. Their "U" shape also tends to trap and pull down the grass fibers, creating noticeable little dimples all along the edge of your lawn.
Why Nails are the Professional’s Choice
Professionals use 5- to 6-inch non-galvanized or galvanized steel nails. Their length allows them to get a deep, firm grip into the sub-base. This provides much stronger holding power that lasts for years. When installing, you should part the grass fibers with your fingers and drive the nail down between the stitch rows. Hammer it until the head is just below the backing, but don’t overdrive it. The grass fibers will then cover the nail head, making it invisible.
| Fastener | Best Use Case | Pros | Cons |
|---|---|---|---|
| Nails (Galvanized) | Securing the perimeter of the installation. | Strong hold, resists rust, hidden finish. | Slightly slower to install than staples. |
| Staples (Galvanized) | Temporarily holding turf in place during install. | Fast to install. | Weaker hold, risk of dimpling, can rust. |
Conclusion
To join artificial turf, always use seam tape and adhesive for the joints. Secure the perimeter with long, galvanized nails. Following these professional methods ensures a durable and beautiful lawn.
_画板-1.png)