_画板-1.png)
You have your beautiful new artificial grass, but it doesn’t fit the space perfectly. An incorrect cut can damage the turf, waste your money, and leave you with an ugly, unprofessional finish. But with the right approach, you can get a perfect cut every time.
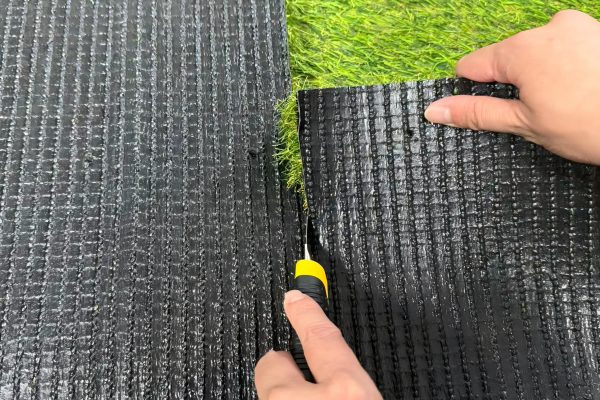
The best method is to cut the artificial grass from the back using a sharp utility knife. Always measure and mark your cutting line on the turf’s backing first. This technique ensures you only slice through the base material, avoiding any damage to the grass blades and creating a clean, invisible edge.
Getting the cut right is a huge part of a successful installation. But just as important is the tool you use. Using the wrong tool can make the job much harder than it needs to be. So, let’s look at what separates a good tool from a bad one for this job.
What is the best tool to cut artificial grass with?
You are standing over a large roll of turf, ready to make the first cut. Using the wrong tool can make this simple task slow and frustrating, resulting in a jagged edge that ruins the final look. The right tool makes the job smooth, safe, and precise.
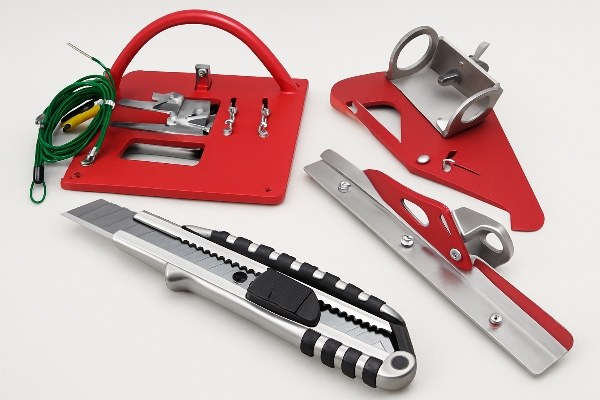
For most DIY home installations, a simple, heavy-duty utility knife with a new, sharp blade is the best tool for the job. Professionals like us use utility knives for detailed work and sometimes use a specialized loop-pile cutter for very long, straight cuts to improve efficiency.
When I was first learning the ropes in the factory’s technical department, the most important lesson was about the blade. A sharp blade is your best friend. A dull one will snag and tear at the turf’s backing, creating a messy line that’s impossible to join neatly. This is why when I train new sales staff, I always show them the difference. A cheap knife or a used blade is a recipe for disaster, especially for customers like José or Carlos who are bidding on projects where appearance is everything. A clean seam starts with a clean cut.
Utility Knives vs. Specialized Turf Cutters
To help you decide, here is a breakdown of the common tools.
| Tool | Best For | Pros | Cons |
|---|---|---|---|
| Utility Knife | DIY jobs, trimming edges, cutting around objects | Inexpensive, easy to find, versatile | Blades dull quickly, can be slower for long cuts |
| Specialized Turf Cutter | Professional installers, long straight lines | Extremely fast and efficient, creates perfect edges | Expensive, not practical for a one-time job |
A utility knife is more than enough for a homeowner installing a new lawn. The key is to have plenty of fresh blades. I recommend changing the blade after every few meters of cutting to ensure it stays sharp. For a professional installer like many of our clients, time is money. A specialized cutter makes long, straight cuts quickly, increasing their efficiency on a large sports field or landscaping project.
Can you cut artificial turf with scissors?
You’re about to make a small cut, but your utility knife is nowhere in sight. A pair of scissors on your workbench looks like a tempting alternative. But using them can turn a simple job into a hand-cramping nightmare that leaves a terribly hacked-up edge on your expensive turf. But can it work in an emergency?
It is not recommended to use scissors for cutting artificial turf. The thick, tough backing will quickly destroy standard household scissors and leave a poor finish. While heavy-duty industrial shears might manage small snips, a utility knife is always the better tool for a clean, professional result.
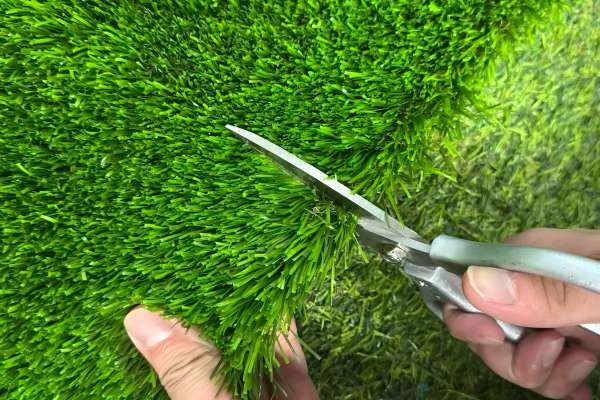
The reason a utility knife is so effective comes down to the "cut from the back" technique. When you slice the backing with a single blade, the grass fibers on the other side are left untouched. They remain connected to the part of the backing you are keeping. This allows them to fall naturally across the seam, hiding it completely. I remember a customer, James from Australia, who called me in a panic because he’d used scissors on a patch. He said it looked like his new lawn had a bad haircut. The clipped grass blades created a visible line that stood out terribly.
Why a Knife Works Best
Scissors have two blades that chew through everything at once. When you try to cut turf with them, you have to force them through the grass fibers first before you can even get to the backing. This action is what creates that ugly, blunt edge.
- Cutting with a Knife from the Back: The blade slices only the flat backing. The grass fibers separate naturally and remain long, ready to blend over a seam.
- Cutting with Scissors: The blades mash through the grass fibers and the backing at the same time. This shortens the fibers right at the edge, making it impossible to hide the cut.
This is a detail I always stress with my clients, from Michael in the United States to Mohammed in the UAE. Understanding this small technical point is the difference between an amateur job and a professional one, and it helps them train their own installation teams for greater success.
How to finish edges of artificial grass?
Your new lawn is cut and laid out perfectly, but now the edges are starting to lift. These unsecured edges are not just an eyesore; they are a serious tripping hazard and allow weeds and debris to creep underneath, which can ruin your entire installation. The final step to a perfect lawn is securing those edges.
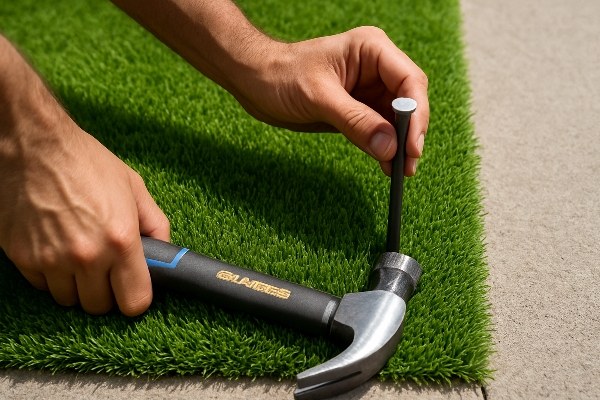
To finish the edges, you must fasten them to the surface below. On soft ground like soil or gravel, use 5- to 6-inch landscaping nails every few inches. On hard surfaces like concrete or wood decking, apply a specialized artificial grass adhesive or seam tape to glue the edges down securely.
The method you choose depends entirely on the base you are working with. Both are simple, but getting it right ensures your investment lasts for years. I’ve seen customers like Budi in Indonesia work on both types of projects, and choosing the right fixing method is critical for dealing with different ground conditions. It’s a key piece of knowledge that turns a good installer into a great one. Don’t let a loose edge trip you up after all your hard work.
Securing Edges: Hard vs. Soft Surfaces
Making the right choice is easy when you know the options.
| Surface Type | Recommended Method | Tools Needed | My Pro Tip |
|---|---|---|---|
| Soft Ground (soil, gravel, sand) | Landscaping Nails | Hammer, 5-6 inch non-galvanized nails | Use non-galvanized nails. They will rust slightly in the ground, which helps them grip the soil better for a stronger hold over time. |
| Hard Surface (concrete, patio, wood) | Adhesive / Seam Tape | Trowel, turf adhesive, weighted objects | Make sure the surface is completely clean and dry before applying any glue. Any dust or moisture will prevent a strong bond from forming. |
For soft surfaces, hammer the nails down just far enough so they disappear into the turf. Don’t hammer them in so deep that you create a visible dip in the surface. For hard surfaces, apply the adhesive evenly with a trowel, then press the turf edge down firmly. You can place heavy objects like bricks or buckets of sand on the edge while the glue cures to ensure a solid, permanent bond.
Conclusion
Cutting artificial grass is simple when you follow the right steps. Always work from the back with a sharp utility knife and securely fasten your edges for a lasting, professional look.
_画板-1.png)