_画板-1.png)
Confused by installation steps? A bad install ruins the best turf, wasting money and time. Follow my professional guide for a perfect, lasting lawn.
Installation involves site preparation, base installation, laying the turf, securing it, and adding infill. Each step is crucial. Proper groundwork ensures drainage and a level surface, while correct turf and infill placement guarantees a natural, long-lasting look.
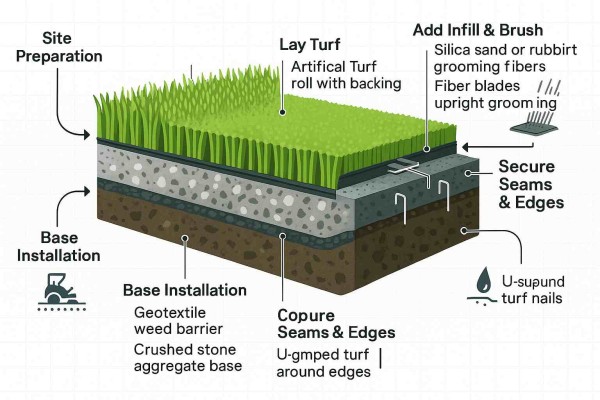
Getting the installation right seems complicated, but it’s not if you break it down. I’ve seen many projects succeed or fail based on these very steps. Let’s go through each part of the process together, so you can avoid common mistakes and achieve a result you can be proud of.
How Do I Prepare the Site and Ensure Proper Drainage for Artificial Grass?
Worried about water pooling on your new turf? Poor drainage creates a soggy, unusable mess. Proper site preparation is your key to a dry, long-lasting surface.
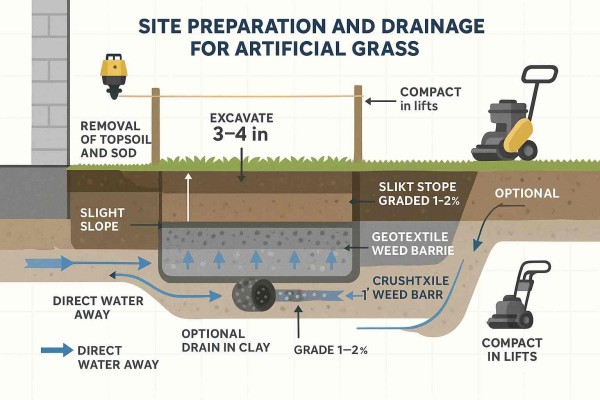
First, excavate 3-4 inches of the existing soil. Then, create a slight slope, about a 1-2% grade, away from buildings. This ensures water runs off properly. Good drainage is the foundation of a successful installation and prevents future headaches.
I can’t stress this enough: site prep is everything. After years in this business, I’ve seen beautiful turf wasted on a poorly prepared base. Start by clearing all existing grass, weeds, and large rocks. You need to excavate the area to a depth of about 4 inches. This creates space for your new base material. The most critical part for drainage is creating a slight grade. Think of it like a very gentle slope; a 1-2% grade is perfect. This directs water away from your home or important structures. If your native soil is heavy clay, you might need to add a perforated drainage pipe system1 underneath for extra protection. A well-drained site prevents mold, mildew, and bad smells down the line. It’s the unseen work that guarantees a great result for years to come.
What Is the Correct Way to Install the Base Layer and Weed Barrier?
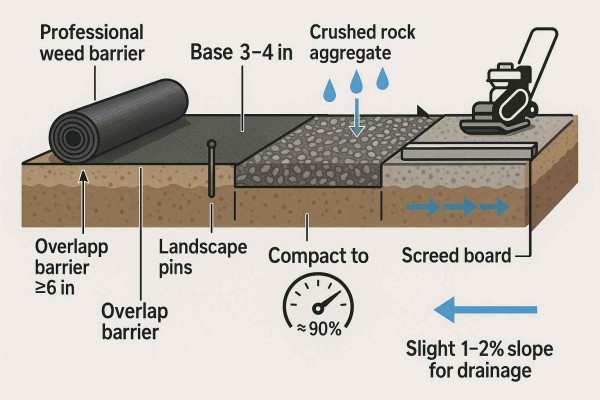
Weeds poking through your perfect lawn? It ruins the look and is a pain to fix later. A solid base and weed barrier prevent this problem from ever starting.
Lay a high-quality geotextile weed barrier over the excavated soil, overlapping the seams by at least 6 inches. Then, add a 3-4 inch layer of crushed rock. Compact this base until it is 90% compacted for a firm, stable foundation.
The base is the skeleton of your artificial lawn, so do not cut corners here. After you’ve prepped the site, roll out a professional-grade weed barrier. I always tell my clients to overlap the edges by at least six inches. This stops determined weeds from finding a gap. Next is the base material itself. We typically use a crushed aggregate, something like Class II road base or decomposed granite. Spread it evenly to a depth of 3-4 inches across the entire area. The key is compaction. You must use a plate compactor to vibrate and settle the material. I check for about 90% compaction. The goal is a surface that is rock-solid but still allows water to pass through. A weak or uneven base will lead to dips and low spots in your turf over time. This two-step process—barrier then base—is your best defense against future problems.
How Do I Properly Lay, Secure, and Trim the Artificial Turf?
Are you seeing ugly seams in your turf? Visible seams make the grass look fake and unprofessional. Follow my simple techniques for a flawless, invisible finish.
Unroll the turf and let it rest in the sun for an hour to relax. Make sure the grain of all pieces runs in the same direction. Cut the factory edge off both pieces you are seaming, butt them together tightly, and secure with seam tape and adhesive.
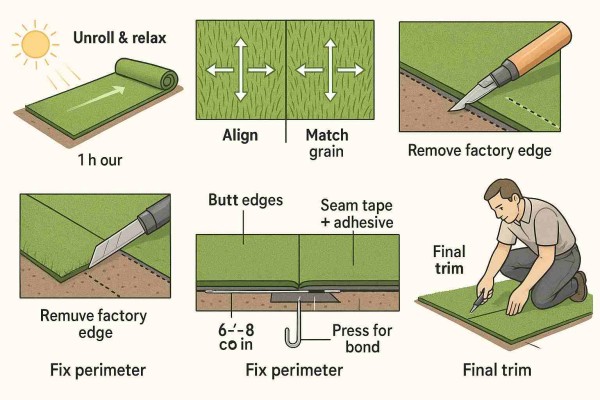
This is where the artistry comes in. First, always roll out your turf and let it sit for a while, especially in the sun. This helps remove any creases from being rolled up. Now for a very important detail: make sure the blade direction, or "grain," is facing the same way on all your pieces. This gives the most natural look. When joining two pieces, you have to create a seamless look. The trick I learned in my early days is to trim 2-3 stitch rows from the factory edge of both pieces you are joining. Push them together so they touch but don’t overlap. Then use a strong seam tape and a good adhesive underneath. Apply pressure along the seam to ensure a strong bond. Around the perimeter, secure the turf with 6-inch galvanized nails or stakes every 6-8 inches. Finally, trim the excess turf2 around the edges with a sharp utility knife for a clean, perfect fit.
What Are the Final Steps for Applying Infill and Grooming the Grass?
Is your new turf lying flat and looking unnatural? Without the right finish, your investment looks cheap. Infill and proper grooming are what make it look and feel real.
Spread the recommended amount of infill, usually silica sand, evenly across the turf. Use a power broom3 or a stiff-bristled push broom to work the infill down into the base of the fibers. This helps the blades stand up and adds stability.
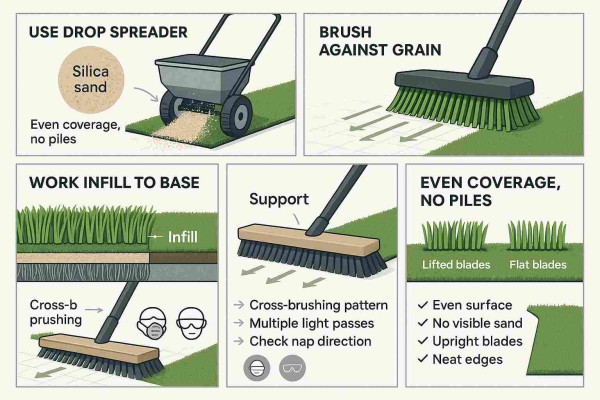
The final steps are what bring your artificial lawn to life. The infill is not optional. It serves several important purposes.
| Function | Benefit |
|---|---|
| Support | It helps the grass blades stand upright, giving a full, lush appearance. |
| Weight | It weighs the turf down, preventing it from shifting, expanding, or rippling. |
| Protection | It protects the turf’s backing material from direct UV-ray exposure, extending its life. |
I usually recommend using a drop spreader to apply the infill evenly. For most landscape projects, silica sand is a great, cost-effective choice. Once the infill is spread, you need to brush it deep into the fibers. A power broom is the best tool for this, as it powerfully brushes the fibers up and works the sand down to the base. If you don’t have one, a stiff push broom will work, but it will take more effort. Always brush against the grain to make the blades stand up tall. This final grooming makes all the difference.
Conclusion
Following these professional installation steps ensures your artificial grass will look great, drain properly, and provide many years of enjoyment. A solid foundation is key to long-term success.
-
A perforated drainage pipe system can enhance drainage, especially in areas with heavy clay soil, preventing water-related problems. ↩
-
Trimming excess turf correctly is crucial for achieving a clean and professional finish around the edges of your installation. ↩
-
A power broom helps evenly distribute infill and stands up grass blades, enhancing the overall appearance of your lawn. ↩
_画板-1.png)